SAML authentication
Zulip supports using SAML authentication for single sign-on, both when
self-hosting or on the Zulip Cloud Plus plan.
This page documents details on how to set up SAML authentication with
Zulip with various common SAML identity providers. Once you have set up
SAML, you may also want to consider configuring SCIM.
If you are self-hosting, this documentation is likely still useful for
how to configure these SAML providers to work with Zulip.
-
Make sure you have created your organization.
-
Set up SAML authentication by following
Okta's documentation.
Specify:
https://auth.zulipchat.com/complete/saml/ for the "Single sign on URL"`.https://zulipchat.com for the "Audience URI (SP Entity ID)".- Skip "Default RelayState".
- Skip "Name ID format".
- Set 'Email` for "Application username format".
- Provide "Attribute statements" of
email to user.email,
first_name to user.firstName, and last_name to user.lastName.
-
Assign the appropriate accounts in the "Assignments" tab. These are the users
that will be able to log in to your Zulip organization.
-
Send the following information to us at support@zulip.com:
- The URL of your zulipchat-hosted organization.
- The "Identity Provider metadata" provided by Okta for the application.
- The name "X" that will be displayed on the "Log in with X" button in Zulip.
- Optionally you can also send us an icon that should be shown on the button.
-
We will take care of the server-side setup and let you know as soon as it's ready.
-
Make sure you have created your organization.
-
Navigate to the OneLogin Applications page, and click "Add App".
-
Search for the "SAML Custom Connector (Advanced)" app and select it.
-
Set a name and logo according to your preferences and click "Save". This doesn't affect anything in Zulip,
but will be shown on your OneLogin Applications page.
-
Go to the "Configuration" section:
- Leave the
RelayState field empty.
- Set
https://zulipchat.com as the Audience.
- Set
https://auth.zulipchat.com/complete/saml/ as the Recipient, ACS URL
and ACS URL Validator.
- Leave the remaining fields as they are.
-
Go to the "Parameters" section. Ignore the pre-configured parameters that are already there
and add custom ones to match the following screenshot:

Make sure to set the "Include in SAML assertion" flag on them.
-
The OneLogin side of configuration should be ready!
Send the following information to us at support@zulip.com:
- The URL of your zulipchat-hosted organization.
- The issuer URL from the "SSO" section. It contains Identity Provider metadata that we will need.
- The name "X" that will be displayed on the "Log in with X" button in Zulip.
- Optionally you can also send us an icon that should be shown on the button.
-
We will take care of the server-side setup and let you know as soon as it's ready.
-
Make sure you have created your organization.
-
From your AzureAD Dashboard, navigate to "Enterprise applications",
click "New application", followed by "Create your own application".
-
Enter a name (E.g. "Zulip Cloud") for the new AzureAD application,
choose "Integrate any other application you don't find in the
gallery (Non-gallery)" and click "Create".
-
From your new AzureAD application's Overview page that opens, go to
"Single sign-on" and select "SAML".
-
In the "Basic SAML Configuration" section:
- Set "Identifier (Entity ID)" to be
https://zulipchat.com.
- Check the "Default" box - this is necessary for IdP-initiated sign on to work.
- Set
https://auth.zulipchat.com/complete/saml/ as the "Reply URL (Assertion Consumer Service URL)".
- Optional: If you want to set up IdP-initiated sign on, enter
{"subdomain": "{your organization's subdomain}"} in the
RelayState field. E.g. if your organization's
address is mytestorganization.zulipchat.com, set this field to
{"subdomain": "mytestorganization"}.
-
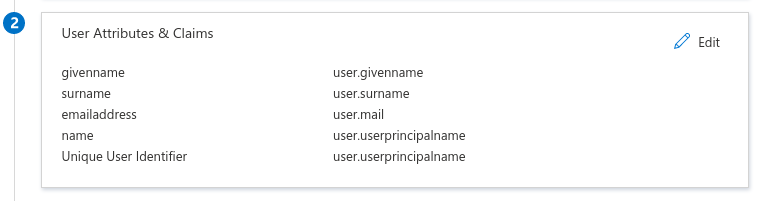
The default "User Attributes & Claims" are correct. If you need to
make changes to them, mention it in your email to support@zulip.com
in a later step. The screenshot below illustrates the expected
configuration - which is the default the new app comes with at the
time of writing this:
-
The AzureAD side of configuration should be ready!
Send the following information to us at support@zulip.com:
- The URL of your zulipchat-hosted organization.
- The
App Federation Metadata Url and the certificate
downloaded from Certificate (Base64) in the "SAML Signing Certificate" section.
- The
Login URL and Azure AD Identifier from the "Set up" section.
- The name "X" that will be displayed on the "Log in with X"
button on the Zulip login page.
- Optionally, you can also send us an icon that should be shown on the button.
-
We will take care of the server-side setup and let you know as soon as it's ready.
-
Make sure you have created your organization.
-
Make sure your Keycloak server is up and running. We assume the URL
is https://keycloak.example.com and your Keycloak realm is yourrealm.
-
In Keycloak, register a new Client for your Zulip organization:
- Client-ID:
https://zulipchat.com
- Client Protocol:
saml
- Client SAML Endpoint: leave this field empty
-
In the Settings tab for your new Keycloak client, set the following properties:
- Valid Redirect URIs:
https://auth.zulipchat.com/*
- Base URL:
https://auth.zulipchat.com/complete/saml/
- Client Signature Required:
Disable
-
In the Mappers tab for your new Keycloak client:
- Create a Mapper for first name:
- Property:
firstName
- Friendly Name:
first_name
- SAML Attribute Name:
first_name
- SAML Attribute Name Format:
Basic
- Create a Mapper for last name:
- Property:
lastName
- Friendly Name:
last_name
- SAML Attribute Name:
last_name
- SAML Attribute Name Format:
Basic
- Create a Mapper for email address:
- Property:
email
- Friendly Name:
email
- SAML Attribute Name:
email
- SAML Attribute Name Format:
Basic
-
The Keycloak side of configuration should be ready! Send the
following information to Zulip Support at support@zulip.com:
- The URL of your Zulip Cloud organization, i.e.
https://example.zulipchat.com.
- The URL of your Keycloak realm. If
master is your Keycloak
realm name, then the Keycloak realm URL should resemble
https://keycloak.example.com/auth/realms/yourrealm.
Related articles